Vpn Port Forwarding Mac. Shimo Vpn Client For Mac
VPNs have become a necessity in today’s digital landscape where cybercrimes are getting more frequent and sophisticated. VPNs provide users a secure and encrypted internet connection, protecting their data and personal information from malicious attackers.There are different types of VPNs and each of them offers different levels of protection. If you want to connect securely to a public Wi-Fi without worrying about your privacy or you want to hide your browsing history, a free VPN would do the job. But if you are looking for a comprehensive online security solution, investing in a paid VPN is the best option.Reliable VPN service providers can mask your IP address and hide your location, unblock geographically-restricted content, hide your online activities from government agencies and ISP providers, and boost your internet speed. Plus, you don’t need to worry about your VPN logging your internet activities.However, not everyone can afford a paid VPN service. So if you have a Mac Mini or any macOS device you can spare, you can set up your own VPN service at home.
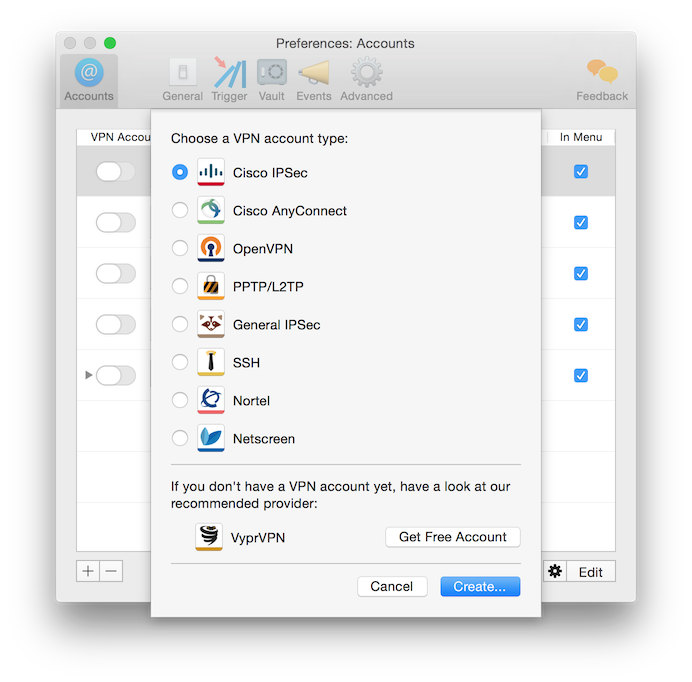
3 Insert your Mac Username and Passwrd then click Install Helper. 4 From Menu bar, click on Shimo Client icon and select “Add VPN Account.
This article will show you the step-by-step process of setting up VPN on a Mac Mini server so you’ll have your own personal virtual private network or VPN. You can use your personal VPN to browse the web safely, connect to your home network, and access files from anywhere in the world.Setting up VPN on a Mac Mini server is a very easy process. All you need is an old Mac, preferably a Mac Mini, and $20 for the software. What You NeedHere is a list of the things you will need in setting up VPN on a Mac Mini server:.
A which you can download from the Mac App Store. A Mac Mini or any old Mac you can spare (just make sure that it meets the minimum requirement for running the software). An Ethernet cable. A regular router.
Transmit ssh. Set Transmit Serial Number. Make the radio packet embed the board serial number with each packet of data. Radio.setTransmitSerialNumber(true); Parameters. Transmit: a boolean that, when true, means that the board serial number is included in each transmitted packet. If false, the serial number value is set to 0.
 “But things sure have changed.”“In less than a year, Feral Interactive delivered some of the finest racing games from Codemasters while indie developers have continued their steady supply of quality titles,” Molina writes. “After testing and evaluating over 20 games, we came up with our top picks. “The last time we tried to list the best racing games for Mac, we couldn’t even find ten different games, let alone ten good ones,” Ric Molina writes for Mac Gamer HQ.
An internet connection. A static IP address or a dynamic DNS address.Before you get started, you also need to make sure that the Mac you are using is performing at its best. You can use an app such as to scan for issues and delete junk files that could affect your Mac’s performance.
Step 1: Download macOS Server from the Mac App Store.You need a stable internet connection for your VPN service so you have to connect your Mac to your router via Ethernet cable. Once everything is plugged in, the next step is to download macOS Server from the Mac App Store.The app is previously known as Mac OS X Server but was changed to macOS Server along with the launch of macOS Sierra. The macOS Server app costs $19.99, and it will be downloaded and installed in the Applications folder once the purchase is complete. The macOS Server is just an app around 106.5 MB in size, so the installation process should be done with a single click.Once installed, double-click the app icon to launch macOS Server. Type in your administrator password to allow the app to make changes to your device. Once the app is launched, two windows will open: the macOS Server Tutorials page and the Server administration console window.You can go through the tutorials if you want to understand more about how the macOS Server works and how to set it up.
But if you want the simplified process of setting up VPN on a Mac Mini server, then proceed with the next step below. Step 2: List down your static IP address or sign up for a dynamic DNS address.The next step is to get your IP address. You can get your IP address by typing this on Google: “What is my IP Address”. However, if you’re a home user, what you’re probably going to get is a dynamic IP address. This means that your router’s IP address may change from time to time.Dynamic IP address is not ideal for setting up your own VPN service because once the IP address changes, your remote connection will fail.If you have a business or enterprise internet account, you can ask your ISP provider what your static IP address is. Some ISP providers, however, require a fee for letting you use a static IP address.If you don’t have access to a static IP address, you can sign up for a dynamic domain name services or DDNS instead.Using a domain name is better because it is easy to remember and the address doesn’t change.
If you have your own website, check with your domain provider how you can get a dynamic DNS for free; otherwise, you will need to sign up for one. Just choose from the many DNS providers that offer this service for free and create your subdomain and domain name. Something like johnsVPN.redhop.com is much easier to remember than a bunch of numbers such as 32.948.310.9, right?It is important that you remember your IP address or DNS address because you’ll be using it to dial from any computer or network around the world. Step 3: Enable port forwarding on your router.Before starting your VPN setup for a Mac Mini server, first you need to configure your router to allow incoming connections on the right ports. Enabling port forwarding is complicated because it depends on what router you are using.Follow these steps to enable port forwarding on your router:. Access your router’s admin page via web browser.
Look for the DHCP or Static Leases section. You need to set up a DHCP reservation so that the local IP address remains the same. Go to the port forwarding section, which is usually found under its own tab, NAT, Firewall, or Virtual Servers.
Once you’re on the port forwarding page, look for the section where you have to enter the details such as Port From, Protocol, IP Address, and Port to. The macOS Server needs four ports open for it to work. These ports are UDP 500, UDP 1701, TCP 1723, and UDP 4500. Save your settings when done.Step 4: Time to set up your server.Remember your static IP address or DNS address? The next step is to enable your IP or DNS address on your Mac so you can connect to it even when you’re not at home.Follow these instructions to set up your server:. Launch macOS Server on your Mac Mini.
Click the name of your computer from the left-side panel. Click Edit Host Name, then hit Next.
Click Internet, then click Next. Type in the domain name you created or your static IP address under Host Name, then click Finish. Click Set Up DNS when prompted. It will automatically start and configure DNS.Your macOS Server is now set up and ready to roll. Step 5: Set up your VPN.Now, the next thing to do is to set up your VPN on your Mac Mini by following these steps:. Click VPN on the left-side menu of the macOS Server. The default settings should have filled out most of the information that you need.
Just make sure that the VPN Host Name you see on the page is the same as the host name you entered in the previous step. Create a unique but easy to remember Shared Secret password.
You’ll need to type in this password every time you need to connect to your server. Look for Client Addresses, then click Edit Addresses. Your network’s IP address should have already populated the field by default.
Change the last digits of your IP address into something higher, like 100 or 200, to prevent your VPN connection from interfering with other connections on your network. Toggle the VPN switch to On.Wait for 10 to 20 seconds and you’ll see your status becomes Available, which means your VPN is all set and ready to go. How to Access Your Personal VPN From Other DevicesOnce you’ve finished setting up VPN on a Mac Mini server, you can now route all traffic from your other devices through it. You can connect other computers and mobile devices to protect your data. Take note that using a VPN may slow down your internet connection, so connect your device only when you need to.To set up your devices, you’ll need your Mac’s username and password, as well as your Shared Secret password.
Fancy using anonymous, safe, secure and restriction free internet on a regular basis? How about trying a top rated Mac VPN management software? Shimo is what you will simply adore because this VPN client provides a rich user interface combined with military-level security. When it comes to creating, editing, and controlling VPN connections, this is the genuine leader.
Supporting more protocols than any other VPN, this Mac VPN client comes with a bunch of advanced capabilities. Plus, it uses the AES 256-bit encryption, which is certified by official organizations, international companies, and army.